# NBVAL_SKIP
from jax import config
#config.update("jax_enable_x64", True)
config.update('jax_num_cpu_devices', 2)
#NBVAL_SKIP
import os

# Only make GPU 0 and GPU 1 visible to JAX:
#os.environ['CUDA_VISIBLE_DEVICES'] = '0,1,2,3,4,5'

import jax

# Now JAX will list two CpuDevice entries
print(jax.devices())
# → [CpuDevice(id=0), CpuDevice(id=1)]
[CpuDevice(id=0), CpuDevice(id=1)]
# NBVAL_SKIP
os.environ['SPS_HOME'] = '/home/annalena_data/sps_fsps'
RUBIX pipeline#
RUBIX is designed as a linear pipeline, where the individual functions are called and constructed as a pipeline. This allows as to execude the whole data transformation from a cosmological hydrodynamical simulation of a galaxy to an IFU cube in two lines of code. This notebook shows, how to execute the pipeline. To see, how the pipeline is execuded in small individual steps per individual function, we refer to the notebook rubix_pipeline_stepwise.ipynb.
How to use the Pipeline#
Define a
configSetup the
pipeline yamlPrepare input data
Run the RUBIX pipeline
Do science with the mock-data
Step 1: Config#
The config contains all the information needed to run the pipeline. Those are run specfic configurations. Currently we support IllustrisTNG and NIHAO as simulation.
For the config you can choose the following options:
pipeline: you specify the name of the pipeline that is stored in the yaml file in rubix/config/pipeline_config.ymllogger: RUBIX has implemented a logger to report the user, what is happening during the pipeline execution and give warningsdata - args - particle_type: load only stars particle (“particle_type”: [“stars”]) or only gas particle (“particle_type”: [“gas”]) or both (“particle_type”: [“stars”,”gas”])data - args - simulation: choose the Illustris simulation (e.g. “simulation”: “TNG50-1”)data - args - snapshot: which time step of the simulation (99 for present day)data - args - save_data_path: set the path to save the downloaded Illustris datadata - load_galaxy_args - id: define, which Illustris galaxy is downloadeddata - load_galaxy_args - reuse: if True, if in th esave_data_path directory a file for this galaxy id already exists, the downloading is skipped and the preexisting file is useddata - subset: only a defined number of stars/gas particles is used and stored for the pipeline. This may be helpful for quick testingsimulation - name: currently only IllustrisTNG is supportedsimulation - args - path: where the data is stored and how the file will be namedoutput_path: where the hdf5 file is stored, which is then the input to the RUBIX pipelinetelescope - name: define the telescope instrument that is observing the simulation. Some telescopes are predefined, e.g. MUSE. If your instrument does not exist predefined, you can easily define your instrument in rubix/telescope/telescopes.yamltelescope - psf: define the point spread function that is applied to the mock datatelescope - lsf: define the line spread function that is applied to the mock datatelescope - noise: define the noise that is applied to the mock datacosmology: specify the cosmology you want to use, standard for RUBIX is “PLANCK15”galaxy - dist_z: specify at which redshift the mock-galaxy is observedgalaxy - rotation: specify the orientation of the galaxy. You can set the types edge-on or face-on or specify the angles alpha, beta and gamma as rotations around x-, y- and z-axisssp - template: specify the simple stellar population lookup template to get the stellar spectrum for each stars particle. In RUBIX frequently “BruzualCharlot2003” is used.
#NBVAL_SKIP
import matplotlib.pyplot as plt
from rubix.core.pipeline import RubixPipeline
import os
2025-07-01 11:54:55,965 - rubix - INFO -
   ___  __  _____  _____  __
  / _ \/ / / / _ )/  _/ |/_/
 / , _/ /_/ / _  |/ /_>  <
/_/|_|\____/____/___/_/|_|


2025-07-01 11:54:55,966 - rubix - INFO - Rubix version: 0.0.post467+g61e4558.d20250616
2025-07-01 11:54:55,967 - rubix - INFO - JAX version: 0.6.0
2025-07-01 11:54:55,967 - rubix - INFO - Running on [CpuDevice(id=0), CpuDevice(id=1)] devices
# NBVAL_SKIP
config_TNG = {
    "pipeline":{"name": "calc_ifu_memory"},

    "logger": {
        "log_level": "DEBUG",
        "log_file_path": None,
        "format": "%(asctime)s - %(name)s - %(levelname)s - %(message)s",
    },
    "data": {
        "name": "IllustrisAPI",
        "args": {
            "api_key": os.environ.get("ILLUSTRIS_API_KEY"),
            "particle_type": ["stars"],
            "simulation": "TNG50-1",
            "snapshot": 99,
            "save_data_path": "data",
        },

        "load_galaxy_args": {
        "id": 12,
        "reuse": True,
        },

        "subset": {
            "use_subset": True,
            "subset_size": 1000,
        },
    },
    "simulation": {
        "name": "IllustrisTNG",
        "args": {
            "path": "data/galaxy-id-12.hdf5",
        },

    },
    "output_path": "output",

    "telescope":
        {"name": "MUSE",
         "psf": {"name": "gaussian", "size": 5, "sigma": 0.6},
         "lsf": {"sigma": 0.5},
         "noise": {"signal_to_noise": 100,"noise_distribution": "normal"},},
    "cosmology":
        {"name": "PLANCK15"},

    "galaxy":
        {"dist_z": 0.1,
         "rotation": {"type": "edge-on"},
        },

    "ssp": {
        "template": {
            "name": "BruzualCharlot2003",
        },
        "dust": {
                "extinction_model": "Cardelli89",
                "dust_to_gas_ratio": 0.01,
                "dust_to_metals_ratio": 0.4,
                "dust_grain_density": 3.5,
                "Rv": 3.1,
            },
    },
}
Step 2: Pipeline yaml#
To run the RUBIX pipeline, you need a yaml file (stored in rubix/config/pipeline_config.yml) that defines which functions are used during the execution of the pipeline. This shows the example pipeline yaml to compute a stellar IFU cube.
calc_ifu_memory:
  Transformers:
    rotate_galaxy:
      name: rotate_galaxy
      depends_on: null
      args: []
      kwargs: {}
    filter_particles:
      name: filter_particles
      depends_on: rotate_galaxy
      args: []
      kwargs: {}
    spaxel_assignment:
      name: spaxel_assignment
      depends_on: filter_particles
      args: []
      kwargs: {}
    calculate_datacube_particlewise:
      name: calculate_datacube_particlewise
      depends_on: spaxel_assignment
      args: []
      kwargs: {}
    convolve_psf:
      name: convolve_psf
      depends_on: calculate_datacube_particlewise
      args: []
      kwargs: {}
    convolve_lsf:
      name: convolve_lsf
      depends_on: convolve_psf
      args: []
      kwargs: {}
    apply_noise:
      name: apply_noise
      depends_on: convolve_lsf
      args: []
      kwargs: {}
There is one thing you have to know about the naming of the functions in this yaml: To use the functions inside the pipeline, the functions have to be called exactly the same as they are returned from the core module function!
Step 3: Run the pipeline#
After defining the config and the pipeline_config you can simply run the whole pipeline by these three lines of code.
#NBVAL_SKIP
pipe = RubixPipeline(config_TNG)
/home/annalena/.conda/envs/rubix/lib/python3.12/site-packages/rubix/telescope/factory.py:26: UserWarning: No telescope config provided, using default stored in /home/annalena/.conda/envs/rubix/lib/python3.12/site-packages/rubix/telescope/telescopes.yaml
  warnings.warn(
#NBVAL_SKIP

inputdata = pipe.prepare_data()
rubixdata = pipe.run_sharded(inputdata)
2025-07-01 11:54:56,212 - rubix - INFO - Getting rubix data...
2025-07-01 11:54:56,213 - rubix - INFO - Loading data from IllustrisAPI
2025-07-01 11:54:56,214 - rubix - INFO - Reusing existing file galaxy-id-12.hdf5. If you want to download the data again, set reuse=False.
2025-07-01 11:54:56,239 - rubix - INFO - Loading data into input handler
2025-07-01 11:54:56,240 - rubix - DEBUG - Loading data from Illustris file..
2025-07-01 11:54:56,240 - rubix - DEBUG - Checking if the fields are present in the file...
2025-07-01 11:54:56,241 - rubix - DEBUG - Keys in the file: <KeysViewHDF5 ['Header', 'PartType4', 'SubhaloData']>
2025-07-01 11:54:56,241 - rubix - DEBUG - Expected fields: ['Header', 'SubhaloData', 'PartType4', 'PartType0']
2025-07-01 11:54:56,242 - rubix - DEBUG - Matching fields: {'PartType4', 'SubhaloData', 'Header'}
2025-07-01 11:54:56,246 - rubix - DEBUG - Found 649384 valid particles out of 649384
2025-07-01 11:54:56,625 - rubix - DEBUG - Converting Stellar Formation Time to Age
2025-07-01 11:55:03,481 - rubix - DEBUG - Converting to Rubix format..
2025-07-01 11:55:03,482 - rubix - DEBUG - Checking if the fields are present in the particle data...
2025-07-01 11:55:03,482 - rubix - DEBUG - Keys in the particle data: dict_keys(['stars'])
2025-07-01 11:55:03,483 - rubix - DEBUG - Expected fields: {'PartType4': 'stars', 'PartType0': 'gas'}
2025-07-01 11:55:03,483 - rubix - DEBUG - Matching fields: {'stars'}
2025-07-01 11:55:03,484 - rubix - DEBUG - Required fields for stars: ['coords', 'mass', 'metallicity', 'velocity', 'age']
2025-07-01 11:55:03,484 - rubix - DEBUG - Available fields in particle_data[stars]: ['coords', 'mass', 'metallicity', 'age', 'velocity']
2025-07-01 11:55:03,485 - rubix - INFO - Rubix file saved at output/rubix_galaxy.h5
2025-07-01 11:55:03,485 - rubix - DEBUG - Creating Rubix file at path: output/rubix_galaxy.h5
2025-07-01 11:55:03,490 - rubix - DEBUG - Converting redshift for galaxy data into
2025-07-01 11:55:03,492 - rubix - DEBUG - Converting center for galaxy data into kpc
2025-07-01 11:55:03,493 - rubix - DEBUG - Converting halfmassrad_stars for galaxy data into kpc
2025-07-01 11:55:03,494 - rubix - DEBUG - Converting coords for particle type stars into kpc
2025-07-01 11:55:03,501 - rubix - DEBUG - Converting mass for particle type stars into Msun
2025-07-01 11:55:03,504 - rubix - DEBUG - Converting metallicity for particle type stars into
2025-07-01 11:55:03,506 - rubix - DEBUG - Converting age for particle type stars into Gyr
2025-07-01 11:55:03,508 - rubix - DEBUG - Converting velocity for particle type stars into km/s
2025-07-01 11:55:03,525 - rubix - INFO - Rubix file saved at output/rubix_galaxy.h5
2025-07-01 11:55:03,552 - rubix - INFO - Centering stars particles
Converted to Rubix format!
2025-07-01 11:55:04,305 - rubix - WARNING - The Subset value is set in config. Using only subset of size 1000 for stars
2025-07-01 11:55:04,306 - rubix - INFO - Data loaded with 1000 star particles and 0 gas particles.
2025-07-01 11:55:04,307 - rubix - INFO - Setting up the pipeline...
2025-07-01 11:55:04,308 - rubix - DEBUG - Pipeline Configuration: {'Transformers': {'rotate_galaxy': {'name': 'rotate_galaxy', 'depends_on': None, 'args': [], 'kwargs': {}}, 'filter_particles': {'name': 'filter_particles', 'depends_on': 'rotate_galaxy', 'args': [], 'kwargs': {}}, 'spaxel_assignment': {'name': 'spaxel_assignment', 'depends_on': 'filter_particles', 'args': [], 'kwargs': {}}, 'calculate_datacube_particlewise': {'name': 'calculate_datacube_particlewise', 'depends_on': 'spaxel_assignment', 'args': [], 'kwargs': {}}, 'convolve_psf': {'name': 'convolve_psf', 'depends_on': 'calculate_datacube_particlewise', 'args': [], 'kwargs': {}}, 'convolve_lsf': {'name': 'convolve_lsf', 'depends_on': 'convolve_psf', 'args': [], 'kwargs': {}}, 'apply_noise': {'name': 'apply_noise', 'depends_on': 'convolve_lsf', 'args': [], 'kwargs': {}}}}
2025-07-01 11:55:04,309 - rubix - DEBUG - Roataion Type found: edge-on
2025-07-01 11:55:04,311 - rubix - INFO - Calculating spatial bin edges...
/home/annalena/.conda/envs/rubix/lib/python3.12/site-packages/rubix/telescope/factory.py:26: UserWarning: No telescope config provided, using default stored in /home/annalena/.conda/envs/rubix/lib/python3.12/site-packages/rubix/telescope/telescopes.yaml
  warnings.warn(
2025-07-01 11:55:04,335 - rubix - INFO - Getting cosmology...
2025-07-01 11:55:04,490 - rubix - INFO - Calculating spatial bin edges...
2025-07-01 11:55:04,500 - rubix - INFO - Getting cosmology...
2025-07-01 11:55:04,512 - rubix - DEBUG - Method not defined, using default method: cubic
/home/annalena/.conda/envs/rubix/lib/python3.12/site-packages/rubix/telescope/factory.py:26: UserWarning: No telescope config provided, using default stored in /home/annalena/.conda/envs/rubix/lib/python3.12/site-packages/rubix/telescope/telescopes.yaml
  warnings.warn(
2025-07-01 11:55:04,547 - rubix - DEBUG - SSP Wave: (842,)
/home/annalena/.conda/envs/rubix/lib/python3.12/site-packages/rubix/telescope/factory.py:26: UserWarning: No telescope config provided, using default stored in /home/annalena/.conda/envs/rubix/lib/python3.12/site-packages/rubix/telescope/telescopes.yaml
  warnings.warn(
2025-07-01 11:55:04,559 - rubix - INFO - Getting cosmology...
/home/annalena/.conda/envs/rubix/lib/python3.12/site-packages/rubix/telescope/factory.py:26: UserWarning: No telescope config provided, using default stored in /home/annalena/.conda/envs/rubix/lib/python3.12/site-packages/rubix/telescope/telescopes.yaml
  warnings.warn(
2025-07-01 11:55:04,598 - rubix - DEBUG - Method not defined, using default method: cubic
/home/annalena/.conda/envs/rubix/lib/python3.12/site-packages/rubix/telescope/factory.py:26: UserWarning: No telescope config provided, using default stored in /home/annalena/.conda/envs/rubix/lib/python3.12/site-packages/rubix/telescope/telescopes.yaml
  warnings.warn(
2025-07-01 11:55:04,772 - rubix - INFO - Assembling the pipeline...
2025-07-01 11:55:04,773 - rubix - INFO - Compiling the expressions...
2025-07-01 11:55:04,774 - rubix - INFO - Number of devices: 2
2025-07-01 11:55:04,897 - rubix - INFO - Rotating galaxy with alpha=90.0, beta=0.0, gamma=0.0
2025-07-01 11:55:04,897 - rubix - DEBUG - No rotation matrix provided, using Euler angles for rotation.
2025-07-01 11:55:05,000 - rubix - INFO - Filtering particles outside the aperture...
2025-07-01 11:55:05,005 - rubix - INFO - Assigning particles to spaxels...
2025-07-01 11:55:05,029 - rubix - INFO - Calculating Data Cube (combined per‐particle)…
2025-07-01 11:55:05,262 - rubix - DEBUG - Datacube shape: (25, 25, 3721)
2025-07-01 11:55:05,262 - rubix - INFO - Convolving with PSF...
2025-07-01 11:55:05,266 - rubix - INFO - Convolving with LSF...
2025-07-01 11:55:05,271 - rubix - INFO - Applying noise to datacube with signal to noise ratio: 100 and noise distribution: normal
2025-07-01 11:55:07,306 - rubix - INFO - Pipeline run completed in 3.00 seconds.
Convert luminosity to flux#
The output of the pipeline is a cube in luminosity. As observers work with flux, we have to convert our luminosity cube to a flux cube.
# NBVAL_SKIP
from rubix.spectra.ifu import convert_luminoisty_to_flux
from rubix.cosmology import PLANCK15

observation_lum_dist = PLANCK15.luminosity_distance_to_z(config_TNG["galaxy"]["dist_z"])
observation_z = config_TNG["galaxy"]["dist_z"]
pixel_size = 1.0
fluxcube = convert_luminoisty_to_flux(rubixdata, observation_lum_dist, observation_z, pixel_size)
rubixdata = fluxcube/1e-20
Store datacube in a fits file with header#
If you want to have the datacube stored in a fits file, this is supported by these lines of code.
#NBVAL_SKIP
#from rubix.core.fits import store_fits

#store_fits(config_TNG, rubixdata, "./output/")
Step 4: Mock-data#
Now we have our final datacube and can use the mock-data to do science. Here we have a quick look in the optical wavelengthrange of the mock-datacube and show the spectra of a central spaxel and a spatial image.
#NBVAL_SKIP
import jax.numpy as jnp

wave = pipe.telescope.wave_seq
# get the indices of the visible wavelengths of 4000-8000 Angstroms
visible_indices = jnp.where((wave >= 4000) & (wave <= 8000))
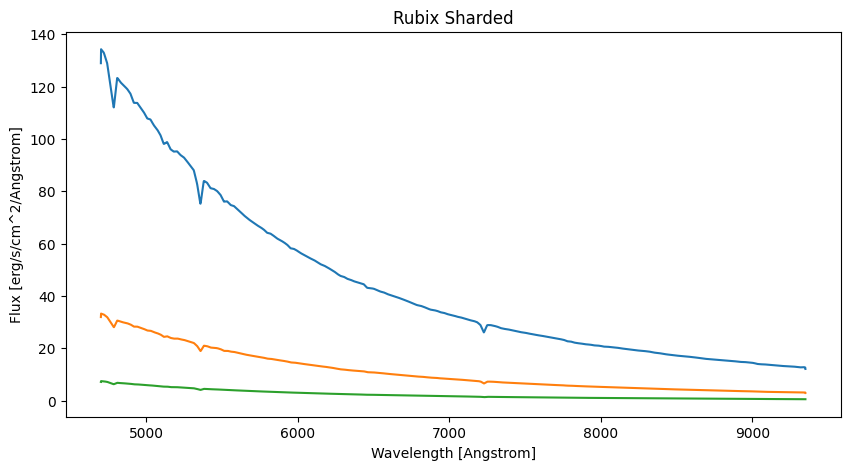
This is how you can access the spectrum of an individual spaxel, the wavelength can be accessed via pipe.wave_seq
#NBVAL_SKIP
wave = pipe.telescope.wave_seq

spectra_sharded = rubixdata # Spectra of all stars

plt.figure(figsize=(10, 5))

#plt.subplot(1, 2, 2)
plt.title("Rubix Sharded")
plt.xlabel("Wavelength [Angstrom]")
plt.ylabel("Flux [erg/s/cm^2/Angstrom]")
plt.plot(wave, spectra_sharded[12,12,:])
plt.plot(wave, spectra_sharded[12,15,:])
plt.plot(wave, spectra_sharded[15,12,:])

plt.show()
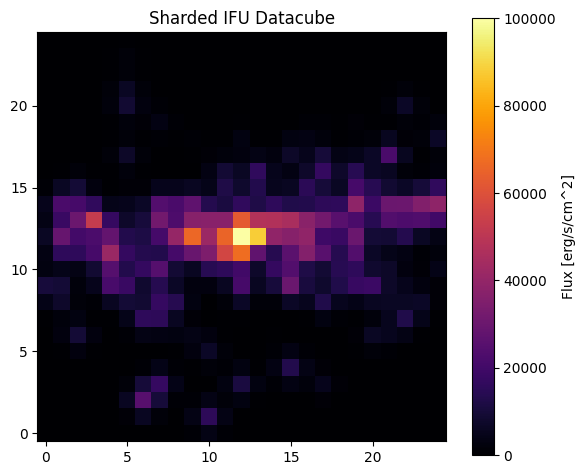
Plot a spacial image of the data cube
#NBVAL_SKIP
import numpy as np
# get the spectra of the visible wavelengths from the ifu cube
sharded_visible_spectra = rubixdata[ :, :, visible_indices[0]]

sharded_image = jnp.sum(sharded_visible_spectra, axis=2)
img32 = np.array(sharded_image, dtype=np.float32)

# Plot side by side
plt.figure(figsize=(6, 5))

# Sharded IFU datacube image
plt.imshow(img32, origin="lower", cmap="inferno", vmin=0, vmax=1e5)
plt.title("Sharded IFU Datacube")
plt.colorbar(label="Flux [erg/s/cm^2]")

plt.tight_layout()
plt.show()
DONE!#
Congratulations, you have sucessfully run the RUBIX pipeline to create your own mock-observed IFU datacube! Now enjoy playing around with the RUBIX pipeline and enjoy doing amazing science with RUBIX :)